jueves, 6 de marzo de 2014

How to manually set up my wireless network with Verizon DSL.


Manually setup a wireless connection
NOTE: In order to continue with this process you need to know the ESSID, Security Type and Security Password.
Click Start.


Click " Connect to" 
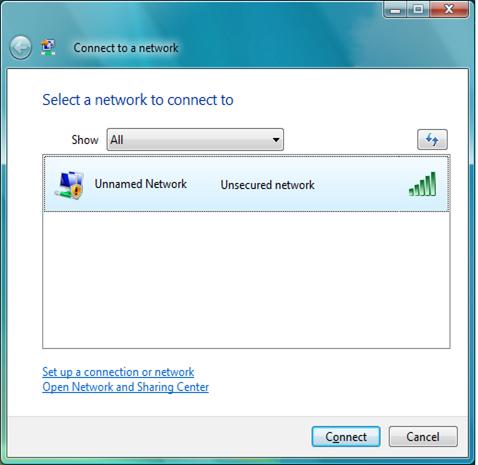
Figure 2: Select a Network to Connect to Window
Click Set up a connection or network to display the Choose a connection option window. 
Figure 3: Choose a Connection Option Window
Click Manually connect to a wireless network and click Next to display the Manually connect to a wireless network window. 
Figure 4: Manually connect to a Wireless Network Window
Type your wireless network name in the Network name box.
Use the drop-down menu next to Security type to select the correct security method.
Type your Security Key using WEP.
Click to check the boxes next to Start this connection automatically and UNCHECK Connect even if the network is not broadcasting.
Click Next to open the Successfully added network window. 
Figure 5: Successfully Added Network Window
Click Connect to to display the Disconnect or connect to another network window. 
Figure 6: Disconnect or Connect to Another Network Window
Click your Network from the list to display the Set Network Location window. 
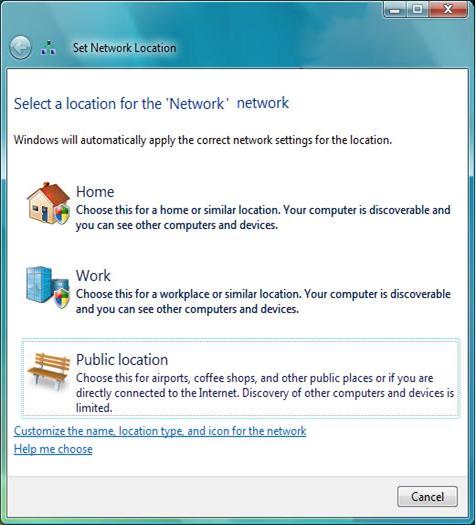
Figure 7: Set Network Location Window

Click HomeWork or Public location, depending on your location to display the User Account Control window.
Click Continue to display the Successfully set network settings window.
Click Close to close the Successfully set network settings window.
Click the red X in the upper right-hand corner of the Disconnect or connect to another network window to close it.
Click the red X in the upper right-hand corner of the Network and Sharing Center window to close it.
Click the red X in the upper right-hand corner of the Network window to close it.

lunes, 5 de agosto de 2013

Create a Manual Wireless Connection (SSID Not Broadcasted) Windows 8

Create a Manual Wireless Connection (SSID Not Broadcasted)  Windows 8


This walk through will show you how to create a manual wireless connection (connect to a hidden network) using Windows 8 from the start menu
For security purposes, SSID's or network names are not always broadcast. In this case, it is required that you add the connection manually
From the Start Menu perform the following steps :
  1. Right Click on an open area of the Start Menu screen
  2. A slider bar will pop up along the bottom of the screen
  3. Click All Apps on the slider bar
  4. Now click Control Panel under Windows System in the list of applications.


The Control Panel is displayed
From this point forward, the steps for Windows 8 are identical to Windows 7
If you are in category view, click View network status and tasks under Network and Internet
Or
If you are in the icon list view, click Network and sharing   


Network and Sharing is displayed
Click Set up a new connection or  network.


New connection options are displayed
Select Manually connect to a wireless network
  • If this option is not available, the user does not have a working wireless adapter installed


The Manual connection screen is displayed
Enter the following information: (Note: all settings must match those of the wireless connection or the connection attempt will fail)
  • Network Name (Network SSID)
  • Security Type (Select from WEP, WPA, WPA2, Personal etc)
  • Encryption Type (Select AES or TKIP)
  • Security Key
    • Hide characters is optional
  • Optional - Place a check in Start this connection automatically (Recommended)
  • Optional - Place a check in Connect even if the network is not broadcasting


A confirmation page is displayed
If your settings were correct, you should now be successfully connected to the wireless network


Optional Step
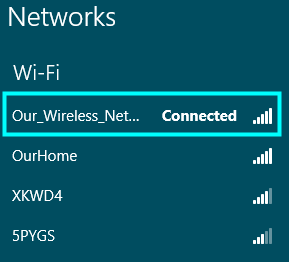
If you want to confirm that you are connected to the hidden wireless network, display the available wireless networks, and your network should now be present and show connected.


Verify Wireless Network Settings Windows 8

 Verify Wireless Network Settings  Windows 8


This walk through will show you how to verify wireless network settings and change the network key for a wireless connection in Windows 8 from the start menu
From the start menu perform the following steps:
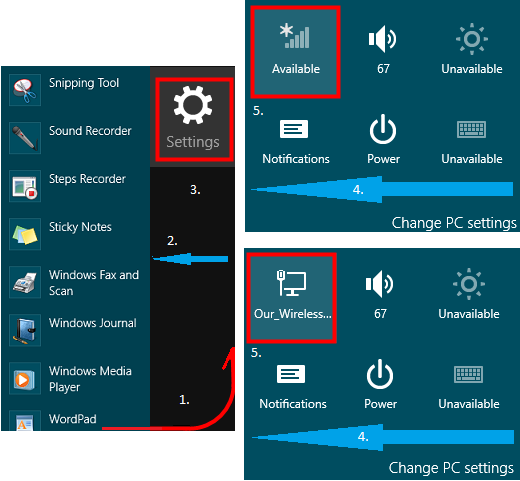
  1. Sweep the mouse from the bottom of the screen to the right edge and then run it up the right edge of the screen.
    -This should be one smooth motion,
    no mouse click is required. This will activate the charms menu.
    -
    Note that you must touch the bottom of the screen as well as the right edge of the screen or the charms menu will not activate
  2. The charms menu will slide out from the right side of the screen
  3. Click Settings in the charms menu
  4. The settings menu will slide out from the right hand side of the screen
  5. Click the Network icon. The icon may look like:
    - A set of signal bars or
    - A computer with an ethernet cable next to it (name of network will vary)
A list of available wireless networks will slide out from the right side of the screen
Right click the wireless network you want to verify the properties or change the password for
NOTE: You can only select wireless networks that you are currently connected to or have connected to in the past
Select View connection properties from the displayed context menu


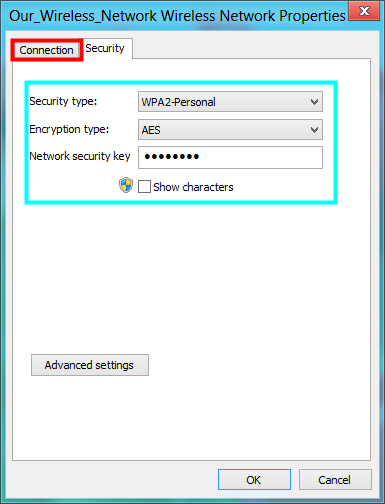
The security tab of the wireless network properties are displayed
Here you can change:
  • Security Type (Select from WEP, WPA, WPA2, Personal etc)
  • Encryption Type (Select from AES or TKIP)
  • Security Key
    • Show characters is optional
If any changes are needed, make them before proceeding
Click the Connection tab


The connection tab displays an overview of the following:
  • Name
  • SSID
  • Network Type
  • Network Availability
Place a check in the block next to Connect automatically when this network is in range
Optional - Look for other wireless networks while connected to this network
Place a check in the block next to Connect even if the network is not broadcasting its name (SSID)
Click OK


Changing the Connection Order of Wireless Networks Windows 7

Changing the Connection Order of Wireless Networks  Windows 7


This walk through will show you how to change the connection order of Wireless Connections in Windows 7 using the Start Menu.
Circumstances can arise when your computer has been connected to numerous wireless networks. This can change the connection order of preferred networks in Windows. To ensure you are connecting to your preferred network at a given location, it may be necessary to change the preferred connection order.

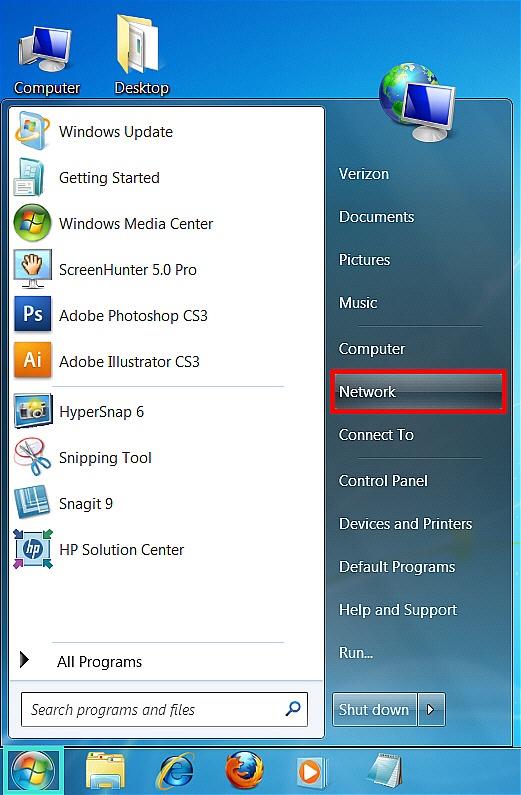
Single left click on the Windows Orb or press the Windows Key on your keyboard.
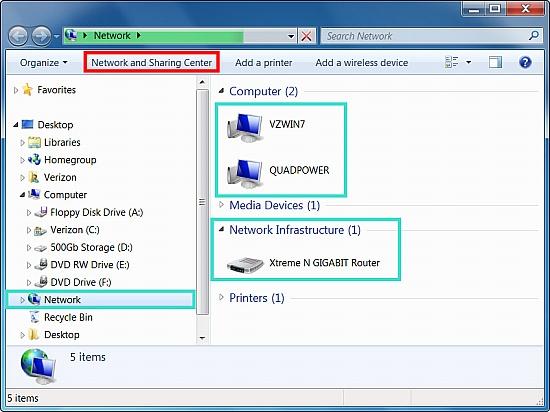
Click on Network.


The Network window is displayed.
Click on Network and Sharing Center

-=-=-=-=Additional Information=-=-=-=-
Depending on how Windows 7 is configured, if you are connected to a network either wired or wirelessly, you could possibly see other computers and network devices that are connected to the network. (Blue boxes)


The Network and Sharing Center is displayed.
Click on the Manage wireless networks option in the list of options to the left


A list of stored wireless network connections is displayed. These are networks that have been successfully connected to by the computer you are working on.
For this example we will use My_Wireless_Network.
The order in which the wireless network connections are displayed is the preferred order that Windows will use to connect to them.
Select the wireless network connection you wish to change the order of by single left clicking on it.
Now click move up in the top menu bar.
You notice that the wireless network you have chosen is moved up by one in the list. Continue this step until the network you want is at the top of the list


Now that your wireless network connection is at the top of the list, notice that you can move it down should you need to by repeating this process but selecting the move down option in the top menu bar.
The next time this computer comes within range of the wireless network connection at the top of the list, it will try to connect to it first.
You can now close this window and connect to your wireless connection if you are not already connected


Deleting a Wireless Network Connection Windows 8

Deleting a Wireless Network Connection Windows 8


This walk through will show you how to connect to a wireless network in Windows 8 from the start menu
From the start menu perform the following steps:
  1. Sweep the mouse from the bottom of the screen to the right edge and then run it up the right edge of the screen.
    -This should be one smooth motion,
    no mouse click is required. This will activate the charms menu.
    -
    Note that you must touch the bottom of the screen as well as the right edge of the screen or the charms menu will not activate
  2. The charms menu will slide out from the right side of the screen
  3. Click Settings in the charms menu
  4. The settings menu will slide out from the right hand side of the screen
  5. Click the Network icon. The icon may look like:
    - A set of signal bars or
    - A computer with an ethernet cable next to it (name of network will vary)


A list of available wireless networks will slide out from the right side of the screen
Right click the wireless network you want to delete
Select Forget this network
All information pertaining to this network has now been DELETED.