jueves, 8 de agosto de 2013

How to Set a Home Page for internet Explore

How to Set a Home Page for internet Explore
This walk through will show you how to set the home page in Microsoft Internet Explorer 10.If you have IE10 open from the desktop in Windows 8 or Windows 7, skip to step 2 now.

If you have IE10 open in the Windows 8 Start Menu view, perform the following steps:
  • Right click in an open space within IE10
  • A slider bar will slide up from the bottom
  • Click the wrench icon
  • Select View on the desktop

Internet Explorer 10 will open on the desktop
From this point forward the steps are identical to Internet Explorer 10


From the top menu, click the Tools icon that looks like a gear in the top right, then select Internet Options


In the General tab, enter the home page address, then click Apply.

Click
OK to exit


View Proxy Settings with internet explore

This walk through will show you how to set proxy settings in Internet Explorer 10.
If you have IE10 open from the desktop in Windows 8 or Windows 7, skip to step 2 now.

If you have IE10 open in the Windows 8 Start Menu view, perform the following steps:

  • Right click in an open space within IE10
  • A slider bar will slide up from the bottom
  • Click the wrench icon
  • Select View on the desktop


Internet Explorer 10 will open on the desktop


From this point forward the steps are identical to Internet Explorer


From the top menu, click the Tools icon that looks like a gear in the top right, then select Internet Options


The Internet Options popup window opens.

Click the
Connections tab


The Connections tab allows you to set up new Internet connections and modify the settings of existing connections.

For regular DSL, the
Never dial a connection option should be selected.

Click the
LAN Settings button


Ensure all blocks are unchecked as no proxy should be used for normal Verizon Broadband.
Click
OK to save your settings


This concludes the Internet Explorer 10 - Proxy Settings walk through

How to enable | disable the Pop-up blocker with internet explore


This walk through will show you how to enable / disable the built-in pop-up blocker in Internet Explorer 10.
Some Web pages automatically open new pop-up windows. This is sometimes useful, but often annoying. By default, Internet Explorer 10 will block pages from opening pop-up windows without your approval, and this is usually the preferred setting.
If you have IE10 open from the desktop in Windows 8 or Windows 7, skip to step 2 now.
If you have IE10 open in the Windows 8 Start Menu view, perform the following steps:

  • Right click in an open space within IE10
  • A slider bar will slide up from the bottom
  • Click the wrench icon
  • Select View on the desktop

Internet Explorer 10 will open on the desktop
From this point forward the steps are identical to Internet Explorer


From the top menu, click the Tools icon that looks like a gear in the top right, then select Internet options


Click on the Privacy tab.

To enable or disable the Pop-up blocker, place or remove the check in
Turn on Pop-up Blocker then select Apply.

You can add and remove specific sites for pop up blocking by clicking on
Settings


When the Pop-up Blocker is on, you can also customize the settings for it.

You can add the address of a website to the list of allowed sites. Type the address in the field and click
Add to allow pop-ups for that website.

Select the
Filter Level from the drop-down list below


To save the new settings, click Close


This concludes the Internet Explorer 10 - Pop-up Blocker walk through

How to Optimize my Browser

How to Optimize my Browser


This walk through will show you how to optimize your browser in Microsoft Internet Explorer 10.
There are three parts for optimizing the browser:
  • Clear Private Data
  • Reset Security Defaults
  • Clear Proxy Settings
If you have IE10 open from the desktop in Windows 8 or Windows 7, skip to step 2 now.
If you have IE10 open in the Windows 8 Start Menu view, perform the following steps:
  • Right click in an open space within IE10
  • A slider bar will slide up from the bottom
  • Click the wrench icon
  • Select View on the desktop
Internet Explorer 10 will open on the desktop
From this point forward the steps are identical to Internet Explorer


From the top menu, click the Tools icon that looks like a gear in the top right of the screen, then select Internet Options


Click on the General tab
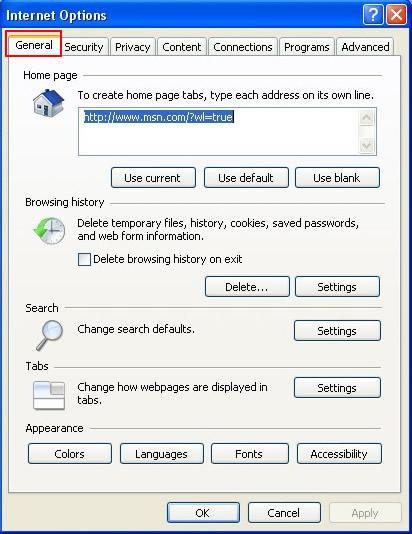


Click the Delete button


The Delete Browsing History window is displayed.Preserve Favorites website data: Keep cookies and temporary Internet files that enable your favorite websites to retain preferences and display faster.Temporary Internet Files: Copies of webpages, images, and media that are saved for faster viewing.Cookies: Files stored on your computer by websites to save preferences such as login information.History: List of websites you have visited.Form Data: Saved information that you have typed into forms.Passwords: Passwords that are automatically filled in when you log on to a website you've previously visited.InPrivate Filtering data: Saved data used by InPrivate Filtering to detect where websites may be automatically sharing details about your visit.

To optimize your browser, select
Temporary Internet Files, Cookies, History, Form Data, Passwords, InPrivate Filtering data, and Preserve favorite website data.

Click the
Delete button


Click on the Security tab
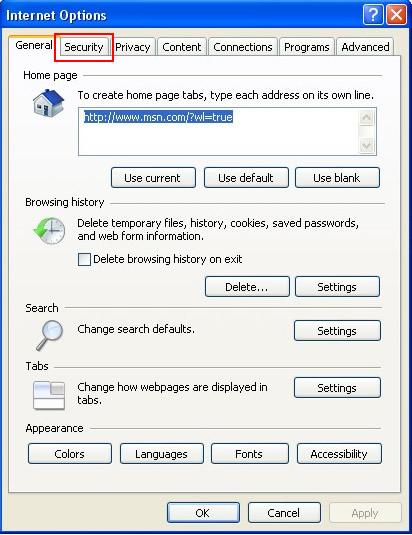


To reset to defaults, click the Reset all zones to default level button


On the Privacy tab, please select Default if available


Click on the Content tab.

There are no settings to change on this tab


Click on the Connections tab


Click the LAN Settings button


To clear the proxy settings, uncheck Use a proxy server for your LAN or delete all the proxies and ports under the manual proxy configuration


Click on the Programs tab.

There are no settings to change on this tab
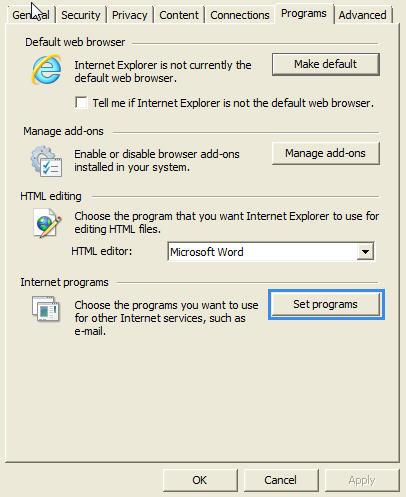


Click on the Advanced tab


To restore advanced settings, click the Restore Advanced Settings button.Note: Takes effect after you restart Internet Explorer


This concludes the Optimize Browser walk through

How to Enabling Cookies using internet explorer

How to Enabling Cookies using internet explorer


This walk through will show you how to Enable Cookies in the Internet Explorer 10 browser.
If you have IE10 open from the desktop in Windows 8 or Windows 7, skip to step 2 now.
If you have IE10 open in the Windows 8 Start Menu view, perform the following steps:
  • Right click in an open space within IE10
  • A slider bar will slide up from the bottom
  • Click the wrench icon
  • Select View on the desktop
Internet Explorer 10 will open on the desktop
From this point forward the steps are identical to Internet Explorer


Click the Tools icon that looks like a gear in the top right, then select Internet  options


Select the Privacy Tab


Block All Cookies is the highest privacy setting. ALL cookies are blocked with no exception


Cookies are enabled on any setting less than Block. Move the slider down further to make more exceptions to enable more cookies. Medium to Medium-High is recommended in most cases


Moving the slider all the way down will accept all cookies


To enable cookies on a 'Per Site' basis click the Sites. Button


Type in the address of the website you would like to enable cookies for. Then click Allow. The domain name will then appear in the Managed Web sites list under the setting Always Allow.

Click
OK when finished


Type in the address of the website you would like to block cookies for. Then click Block. The domain name will then appear in the Managed Web sites list under the setting Always Block.

Click
OK when finished


If the Privacy setting it moved up to Block All Sites, the Site. button will NOT be available+


Click Apply then OK when you have enabled cookies


This concludes the Enabling Cookies walk through

How to export messages with Outlook

How to export messages with Outlook


This walk though will show you how to export mail in Outlook 2010
Click File, Open, and them import


Select Export to File from the list
Now click Next


Select Outlook Data File (.pst) from the list


Select the Inbox or any folder you wish to export


Select the location where you would like to save your file and then give it a name.
Select one of the three options presented regarding duplicate items.


Enter a password if you want to use one. If not, leave the fields blank.


You will be returned to the Outlook main view when completed.


This concludes the How To Export E-Mail in Outlook 2010 walk through


How to Import Messages with Outlook

How to Import Messages with Outlook


This walk though will show you how to import mail in Outlook 2010
Click File, Open, and then import


Select Import from another program or file from the list
Now click Next


Select Outlook Data File (.pst) from the list


Select the file you want to import
Select the option you want for handling duplicate items


Select the folder(s) you wish to import.
If you want to include subfolders, ensure there is a checkmark in the box.
Select the E-Mail account you wish to import the mail to.


You will be returned to the Outlook main view.
You should now see the imported mail


This concludes the How to Import E-Mail in Outlook 2010 walk through